viflow logoknowledge base

Contact Us

Menu
en de
  • viflow product page
  • Support request

Contact Us

  • viflow knowledge base
  • Instructions
  • WebModel
  • Deploying the viflow WebModel with IIS (Internet Information Services)
WebModel

Deploying the viflow WebModel with IIS (Internet Information Services)

Applies to: viflow (subscription | 9 | 8) | Article: 1342768 | Updated on 21.05.2024

Delete

Important – Technical requirements

A web server is required to operate the viflow WebModel, for example Microsoft Internet Information Services (IIS). In addition, an execution environment is required, which is installed with the "Hosting Bundle" {{1}}. Please note that different versions are required for viflow 8 and viflow (subscription) (3.1 and 6.0):

››› Installation of IIS (Internet Information Services) for viflow WebModels

viflow 8: ››› Download the "Hosting Bundle" (.NET 3.1)
viflow 9/(subscription): ››› Download the "Hosting Bundle" (.NET 6.0)

››› Hosting and deploying ASP.NET Core (official Microsoft documentation)

Step 1 – Storing a viflow WebModel

Storing a viflow WebModel

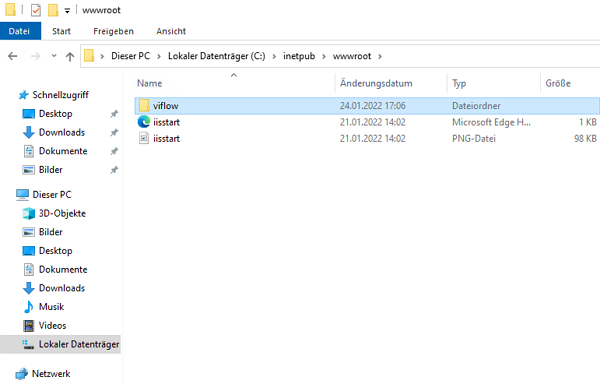
  1. Open File Explorer and go to the C:\inetpub\wwwroot\ directory.
  2. Create a new folder in this directory (here: viflow).
  3. Copy the viflow WebModel to the directory you just created C:\inetpub\wwwroot\FOLDERNAME (here: viflow).
Delete

Note on the viflow WebModel

Using the export function, the viflow WebModel is created from the viflow process model in a freely selectable target directory.
This note is primarily aimed at administrators who are not familiar with the function of the WebModel export - therefore, if necessary, contact the viflow users who are exporting the released process model as a WebModel.
You can find more information on this topic in the viflow help: ››› Export as WebModel. 

Delete

Step 2 – Add Application Pool

Add application pool

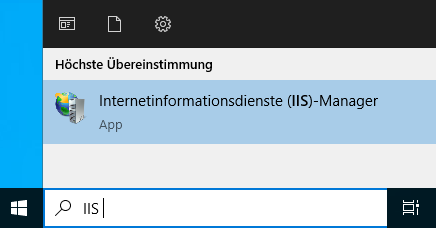
  1. Open Internet Information Services (IIS) Managerby searching for the termIIS.
  2. Select SERVERNAME – Application Pools {{1}} – Right Click – Add Application Pool … {{2}}.
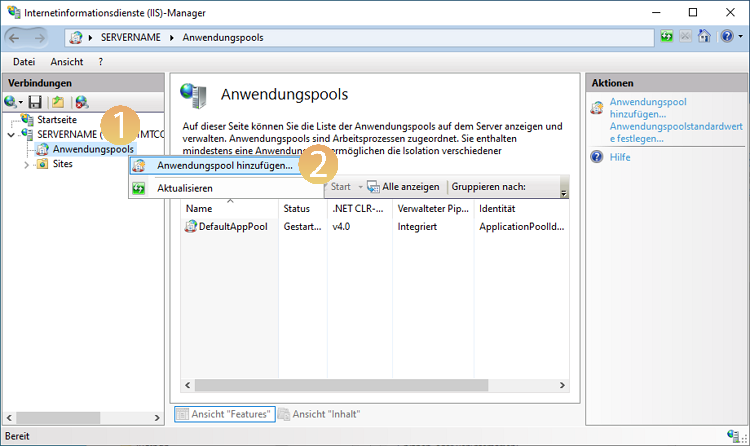
  3. The Add Application Pool dialog appears. Enter a name {{3}} (here: viflow).
  4. Under .NET CLR Version – No Managed Code, select {{4}}.
  5. Under Managed pipeline mode, select Integrated {{5}}.
  6. Enable the Start application pool immediately option {{6}}.
  7. Confirm with OK.
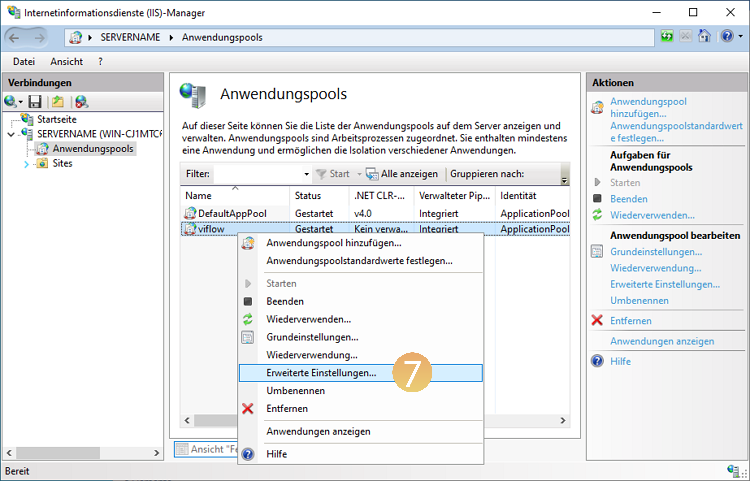
  8. Under Application pools, right-click the newly added application pool (here: viflow ) and select Advanced Settings … {{7}} from the context menu.
  9. Set Process Model – Load User Profile to True {{8}}.
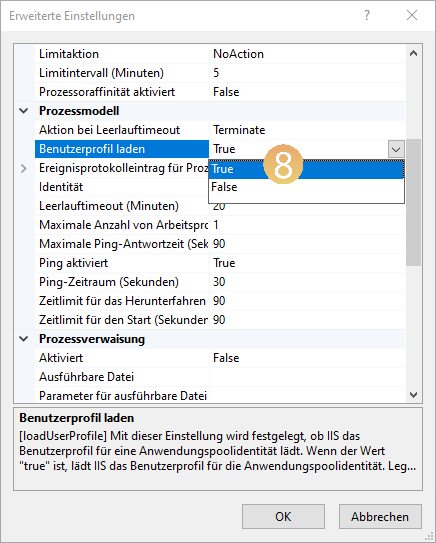
  10. Confirm with OK.
Delete

Step 3 – Allow write access for application pool

Allow write access for application pool

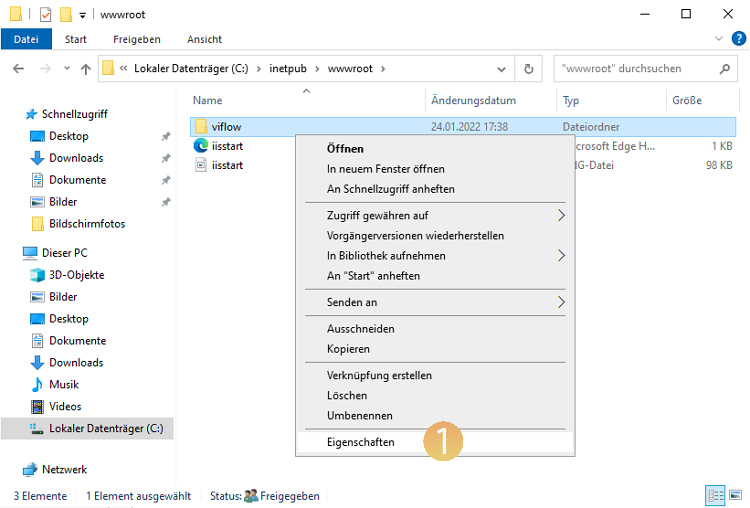
  1. In File Explorer, open the C:\inetpub\wwwroot\ directory.
  2. Right-click on your WebModel folder (here: viflow ) and open Properties {{1}} from the context menu.
  3. On the Security {{2}} tab, click the Edit {{3}} button.
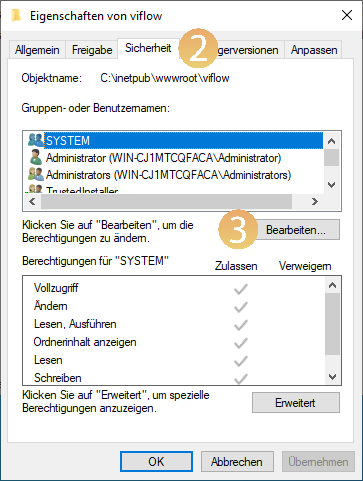
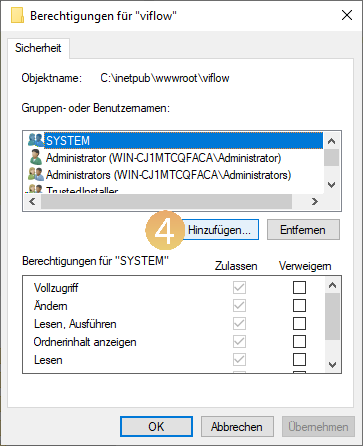
  4. Click the Add... {{4}} button.
  5. In the IIS_IUSRS text box, type {{5}}.
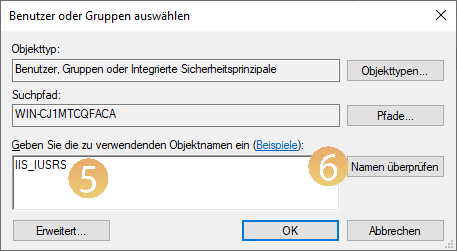
  6. Click the Check Names {{6}} button and confirm with OK.
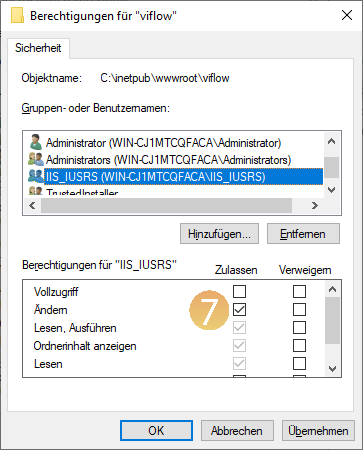
  7. Activate the entry Change (in addition to Read and Write ) {{7}} in the permissions of the user or group IIS_IUSRS.
  8. Confirm with OK.
Delete

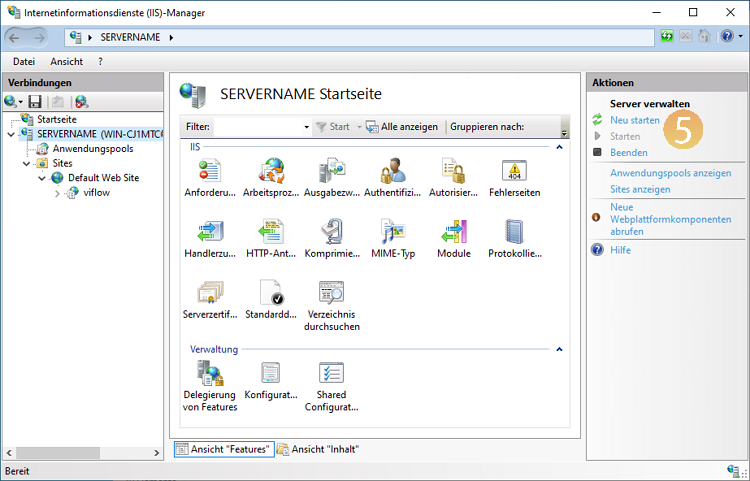
Step 4 – Convert folder to application

Convert folder to application

  1. Under SERVERNAME – Sites – Default Web Site, click on the folder name (here: viflow) {{1}}.
  2. Right-click on the folder (here: viflow) to open the context menu and select Convert to application {{2}}.
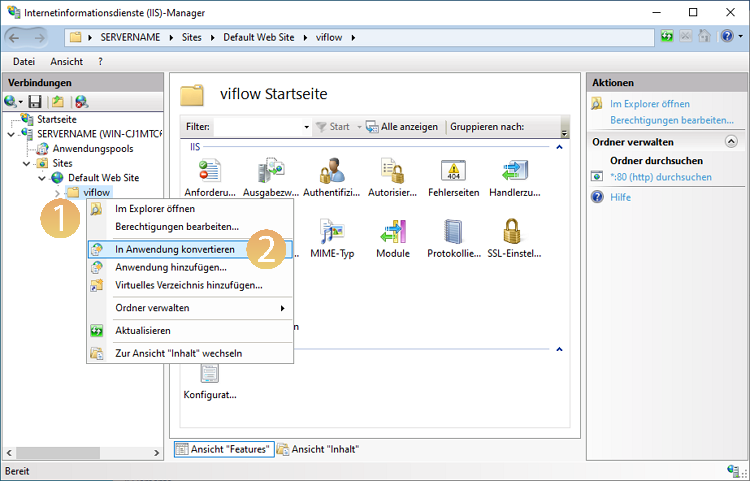
  3. In the Add Application window, click Select... {{3}} and select the application pool (here: viflow) {{4}}.
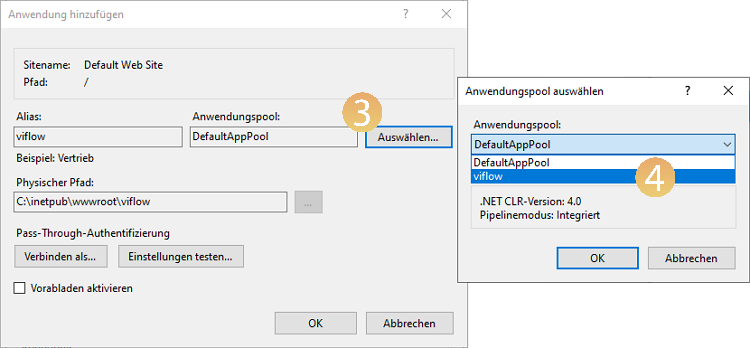
  4. Confirm each entry with OK.
  5. Click SERVERNAME under Connections on the left and Restart {{5}} under Manage Server.
Delete

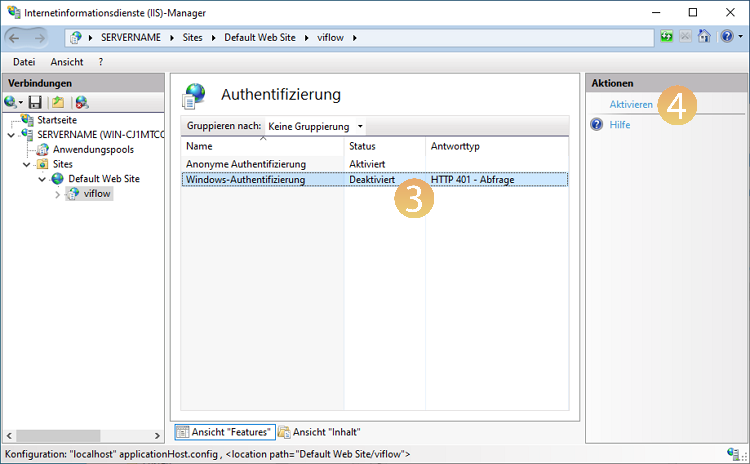
Step 5 – Enable Windows Authentication

Enable Windows authentication

  1. Under SERVERNAME – Sites – Default Web Site , click on the application (here: viflow) {{1}}.
  2. Open the item Authentication with a double click {{2}}.
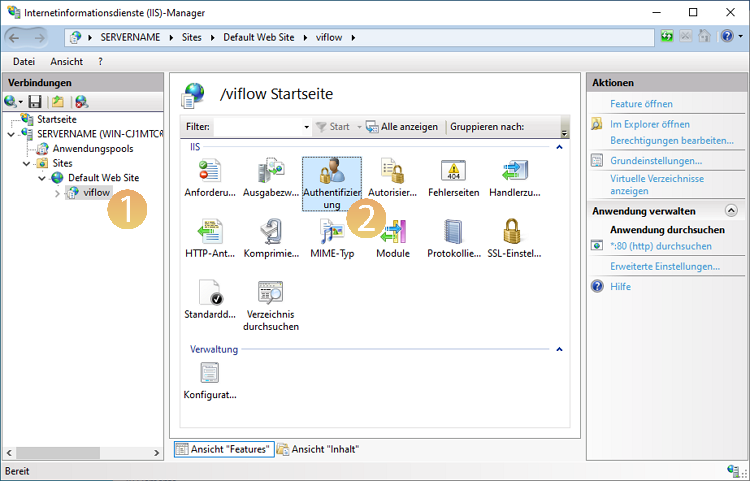
  3. Click Windows Authentication {{3}} and under Actions click Enable {{4}}.
Delete

Step 6 – Set up approval for publication

Set up approval for publication

  1. In File Explorer, open the C:\inetpub\wwwroot directory.
  2. Right-click on the application (here: viflow ) to open the properties {{1}} and click on the Release {{2}} tab.
  3. Click the Release … {{3}} button.
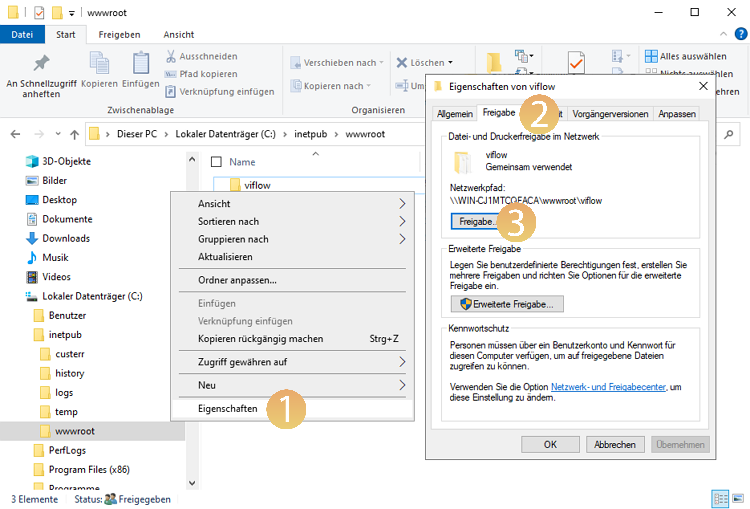
  4. The Network Access dialog opens. Add here the users or groups with read/write rights who are to update or publish the WebModel on the server {{4}}.
    In our example, this was made possible for the group VIFLOW_PUBLISHERS.
Delete

Note

You can add users or groups via the drop-down menu via User/Group name – Add.

Delete

Step 7 – Opening the WebModel

Opening the WebModel

Open the address http://SERVERNAME/FOLDERNAME (here: viflow ) {{1}} in the browser.

Delete
Delete

Note – Multiple WebModels on one web server

Several WebModels can be stored on a web server (like Microsoft's Internet Information Services (IIS) here).
To do this, carry out steps 1 to 7 described above for each WebModel.

All articles in WebModel

  • Use of the hosting service viflow cloud for your web model
  • Improve the performance of the WebModel
  • Deploying the viflow WebModel with IIS (Internet Information Services)
  • Installation of IIS (Internet Information Services) for viflow WebModels
  • Disable caching for viflow WebModels
  • Turn off the login dialog when opening the WebModel
  • Opening the WebModel via HTTPS
  • Operate viflow on Microsoft Azure
  • Open local viflow WebModel
  • Enable single sign-on (SSO) for different browsers
  • Error "HTTP Error 500.37 - ANCM Failed" when starting the WebModel
  • Error "HTTP Error 500.19" when starting the WebModel
  • Error "HTTP Error 500.30 - ANCM" when starting the WebModel
  • Processes are blocked by prohibition signs in the WebModel
  • Calling up documents on a file server via a web server (IIS)
  • Open local/external documents from the WebModel
  • Process Model cannot be exported as WebModel
  • Enable compatibility mode in WebModel – .NET 6.0
  • Open local viflow WebModel as preview
  • Replace WebModel manually on web server
  • Restrict access to WebModel directly on web server
  • Direct linking to specific processes in the WebModel
  • Adjust the name of the viflow WebModel
  • Azure AD connection for the WebModel on IIS
  • Administer WebModel – Set up permissions
  • Changing the viflow cloud password
  • Long loading time when calling up the WebModel
Quicklinks
  • viflow international
  • viflow functions
  • Trainings
  • viflow life cycle
  • viflow system requirements
  • Remote support
  • viflow updates
SUBMIT SUPPORT REQUEST

Couldn't find a solution? Make a support request.

Submit a support request


FOLLOW US

We inform you regularly about current developments, trends and news around viflow. Just choose the format that's right for you.

Newsletter subscription
vilfow auf facebook ViCon auf Xing ViCon auf Linkedin vilfow auf youtube
Contact Central office

+49 511 696048-0

Sales

+49 511 696048-20

Support support@viflow.de
  • Contact
  • T&Cs
  • Conditions of Use
  • Privacy Statement
  • Legal Info

Copyright © 2003 – 2025 ViCon GmbH | viflow knowledge base | All rights reserved.

info@vicon.biz +49 511 696048-0
Knowledge Base Software powered by Helpjuice

Definition by Author

0
0
  • Kontakt
  • AGB
  • Nutzungsbedingungen
  • Datenschutz
  • Impressum

Copyright © 2003 – 2021 ViCon GmbH | Funktionen | Alle Rechte vorbehalten.

info@vicon.biz +49 511 696048-0
Expand