viflow logoknowledge base

Contact Us

Menu
en de
  • viflow product page
  • Support request

Contact Us

  • viflow knowledge base
  • Instructions
  • Installation
  • Setting up an SMTP relay for sending emails (Exchange Online)
Installation

Setting up an SMTP relay for sending emails (Exchange Online)

Applies to: Windows Server bis 2019 | Article: 1819524 | Updated on 18.01.2024

Delete

Article for IT professionals/administrators

Please note that this article is intended for IT professionals or administrators who have the appropriate expertise and all the necessary rights.

Situation

You would like to store an e-mail server – for example for viflow DMS – but use Microsoft Exchange Online. Since this is not supported, you need an SMTP relay.

Solution – Set up SMTP relay for Exchange Online

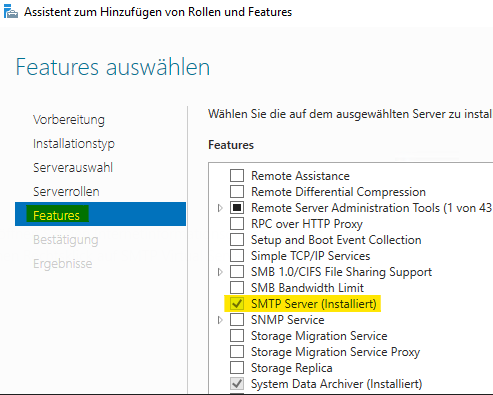
  1. Open Server Manager and navigate to Manage – Add Roles and Features.
  2. Activate the SMTP Server entry under Features and run the installation.
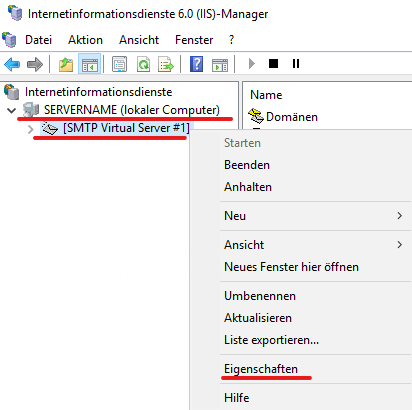
  3. After installation, open Internet Information Services (IIS) Manager (6.0).
  4. Under Local Computer, right click on SMTP Virtual Server #1 and open Properties.
  5. On the Access tab, under Relay Restrictions, click the Relay … button.
  6. In the Relay Restrictions window, click the Add button.
  7. Select Single Computer and enter the localhost IP address.
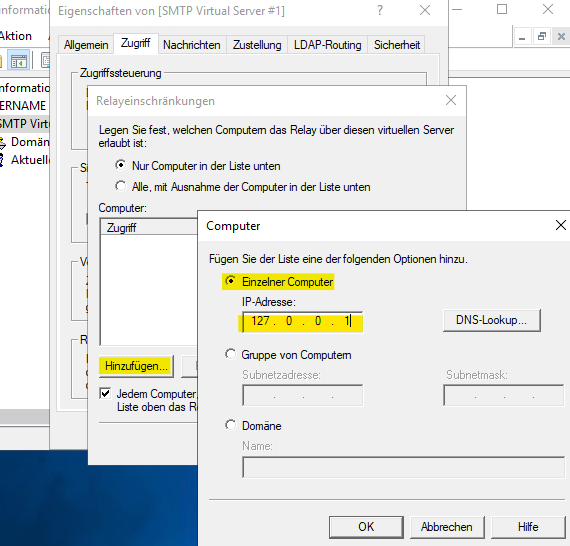
    Confirm the entries with OK.
  8. Go to the Delivery tab and click the Outbound Security … button.
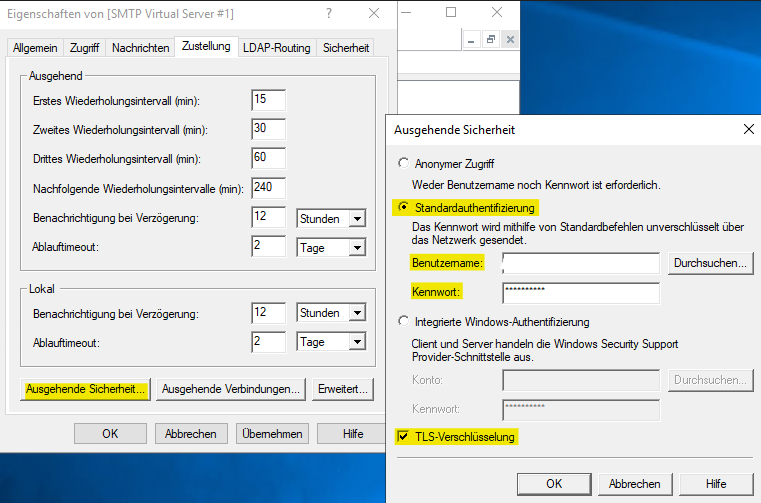
  9. Activate basic authentication, enter the login data for sending emails with username and password and check the box for TLS encryption.
  10. Confirm with OK and click the Outgoing Connections … button.
  11. Enter port 587 as TCP port.
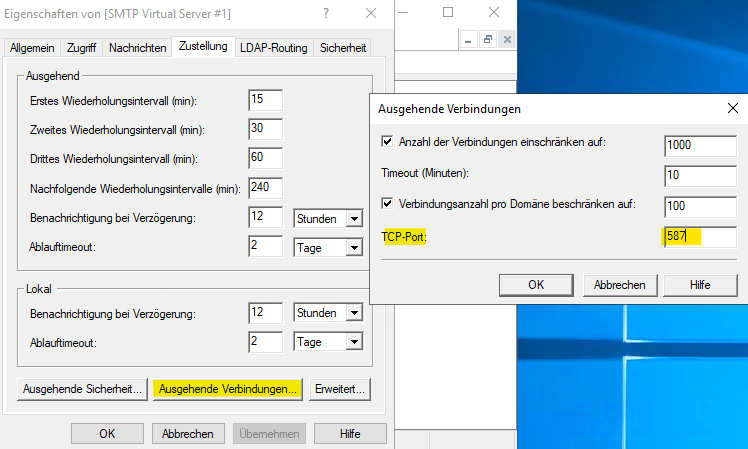
  12. Confirm with OK and click the Advanced … button. 
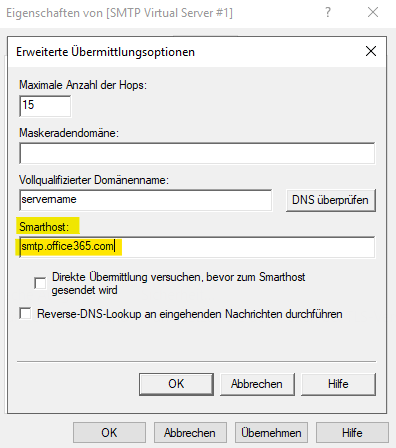
  13. Enter the mail server smtp.office365.com in Smarthorst.
  14. Confirm with OK, apply the changes to the settings and close them with OK.
    This completes the configuration of the SMTP relay.

    Entering the e-mail server data, e.g. in viflow DMS, then looks like this:
    Server: localhost
     port: 25
     TLS: false
     Users: –––
     Password: –––

All articles in Installation

  • ViCon Update – How you keep viflow up to date
  • Installation of Visio 2019 with existing Office 365
  • Silent/administrative installation of viflow
  • Error code "1612" in the "ViCon Update" program
  • viflow tracker – Installation and Configuration
  • Installation of IIS (Internet Information Services) for viflow WebModels
  • License activation on terminal server (e.g. Citrix / XenApp)
  • Download, install and activate viflow
  • Setting up an SMTP relay for sending emails (Exchange Online)
  • "Number of activations exceeded" error message
Quicklinks
  • viflow international
  • viflow functions
  • Trainings
  • viflow life cycle
  • viflow system requirements
  • Remote support
  • viflow updates
SUBMIT SUPPORT REQUEST

Couldn't find a solution? Make a support request.

Submit a support request


FOLLOW US

We inform you regularly about current developments, trends and news around viflow. Just choose the format that's right for you.

Newsletter subscription
vilfow auf facebook ViCon auf Xing ViCon auf Linkedin vilfow auf youtube
Contact Central office

+49 511 696048-0

Sales

+49 511 696048-20

Support support@viflow.de
  • Contact
  • T&Cs
  • Conditions of Use
  • Privacy Statement
  • Legal Info

Copyright © 2003 – 2025 ViCon GmbH | viflow knowledge base | All rights reserved.

info@vicon.biz +49 511 696048-0
Knowledge Base Software powered by Helpjuice

Definition by Author

0
0
  • Kontakt
  • AGB
  • Nutzungsbedingungen
  • Datenschutz
  • Impressum

Copyright © 2003 – 2021 ViCon GmbH | Funktionen | Alle Rechte vorbehalten.

info@vicon.biz +49 511 696048-0
Expand