Using the BPMN template in viflow
Applies to: viflow (subscription | 9 | 8) | Article: 1978762 | Updated on 16.01.2025
1. Download the BPMN template
- Download the BPMN template for viflow at ››› viflow.de/en/downloads or directly ››› here .
- Extract the downloaded ZIP file (*.zip) to any directory. After extraction, the viflow BPMN 3.3.6.vssx file should be in the directory.
2. Import the template into viflow
- In viflow, open the process model in which you want to use the BPMN template.
- In the viflow menu, click Data – From Visio file (import), in the Open Visio File window, select the viflow BPMN 3.3.6.vssx file and click Open.
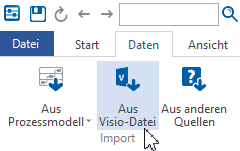
The import starts and these BPMN master shapes are added to the viflow template: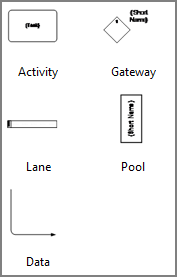
3. Overview – the viflow BPMN shapes
In total, the BPMN template includes five shapes that can be displayed in a variety of ways. There are two process, two area and one information shape:
- Process: Activity and Gateway

- Information: Data

- Area: Lane and Pool

To configure the shapes, simply click on the info symbol at the bottom left of the shape and select the desired properties and display options (see point 4). 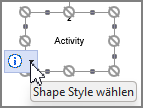
4. Presentation and display options of the BPMN shapes
The BPMN shapes behave exactly like all other viflow shapes (process, information, area) when placed on the drawing sheet. After entering a name, you have the option to customize the BPMN shapes by specifying their shape, alignment, and display options.
To configure the shapes, simply click the info icon at the bottom left of the shape and select the desired properties and display options.
Activity (Prozess)
 |
Header
|
Body
|
With Show markers {{1}} you determine whether the “normal” viflow markers (for notes, participants, documents, key figures, potentials) should be displayed in the shape.
Under Header {{2}} you can see all the display options for the header of the activity shape. With Body {{3}} you can change the shape and appearance and insert symbols at the bottom of the shape.
You can set whether the short or long name should be displayed in the shape under Text {{4}}.
Gateway (Process/Decision)
 |
Layout
|
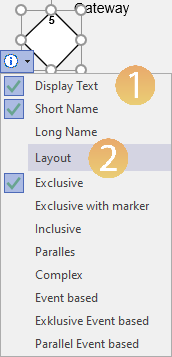
Activate Display Text {{1}} so that the name of the shape is displayed – below this you can specify whether this should be a short or long name.
Under Layout {{2}}, you will see all the display options for the gateway shape.
Data (Information)
 |
Eventtyp
|
Symbol
|
With Event type {{1}} you can select what type of information it is, the symbol to be displayed on the shape can be selected below {{2}}.
Under Text {{3}} you can set whether the short or long name should be displayed on the shape or whether the text should be hidden.
Lane (Area)
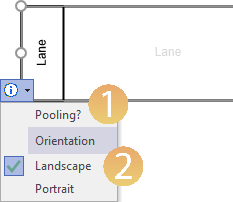
Under Orientation {{2}}, specify whether the lane (or area) should be displayed horizontally (Landscape) or vertically (Portrait). If the lane is to be added to a pool, activate the setting Pooling? {{1}}.
You can find out how to create a pool from several lanes or areas in point 5.
Delete5. Using the BPMN shapes, creating pools
The BPMN shapes are used in the same way as you are used to from the standard shapes in viflow: Drag the shape onto the drawing sheet, give it a name and, if necessary, specify the display options (see point 4 above).
Lanes and Pools
A pool consists of several lanes and can represent a company or a higher organizational unit, for example. To form pools:
- Drag the lanes that (should) belong to a pool onto the drawing sheet and place them directly on top of each other.
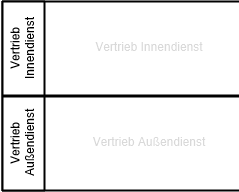
- Click on the info symbol on the shapes and activate the Pooling? function in each case.
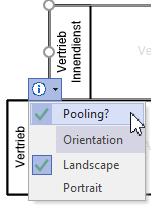
The shapes are indented to the right. - Now drag the shape Pool onto the drawing page and place it directly in front of the lanes that belong to the pool.
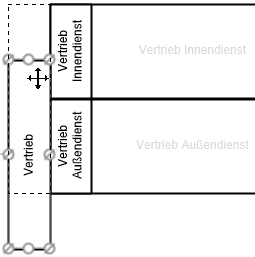
If necessary, manually align and resize the shape.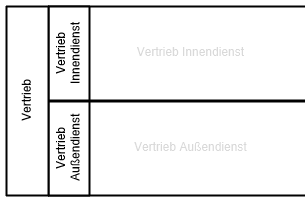
 ]
] ]
] ]
] ]
] ]
] ]
] ]
] ]
] ]
] ]
] ]
] ]
] ]
] ]
] ]
] ]
] ]
] ]
] ]
] ]
] ]
] ]
] ]
] ]
] ]
] ]
] ]
] ]
] ]
] ]
] ]
] ]
] ]
] ]
]