
"View" tab
Applies to: viflow 8 | Article: 1561898 | Updated on 11.03.2024


In the View tab you will find all the functions for numbering and sorting the processes as well as opening windows and loading layouts.
View group
button/option |
function |
a notice |
|
Opens the properties window of the selected object. |
Alternatively callable in the context menu [ |
|
The Explorer window opens. |
You can find more information on this in the chapter |
|
Opens the window with the recently edited objects. |
For quickly finding and calling up frequently used functions |
viflow (subsription):
|
The Recycle bin window opens. |
Information on the objects in the recycle bin can be found in the chapter '››› Using the recycle bin |
viflow 8: |
The History window opens. |
Information on the history can be found in the chapter |
viflow (subscription): |
Option fields for calling up the most important window Process Structure, Information, Areas. |
In the default layout, all three windows are displayed |
viflow 8:
|
Option fields for calling up the most important window Processes, Information, Areas. |
In the default layout, all three windows are displayed |
|
To select all viflow windows including the Overview window. |
Further information on the viflow windows can be found in the chapter |
|
For loading and saving standard and user-defined layouts (views). |
All information about your own layouts can be found in the chapter |
|
Hide all windows with one click. |
If the windows are hidden, the button is called Show All Windows |
|
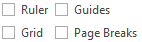
For better orientation when modeling, the Grid is displayed by default. |
|
|
To change the grid spacing, open the Ruler and Grid window by clicking the arrow icon [ |

.png) ] of an object. The local properties can be called up by clicking on the arrow in the button.
] of an object. The local properties can be called up by clicking on the arrow in the button.


.png)
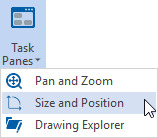
Task Panes – Pan and Zoom
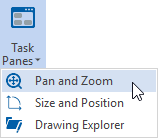
Select this option to open the pan and zoom window. This enables convenient navigation, especially in larger graphics, and allows finely graduated adjustment of the zoom factor by using the slider or the [+] and [-] buttons. To zoom into the process graphic, simply open an area in the window with the left mouse pointer.

The pan and zoom window can be placed and pinned anywhere on the drawing sheet.
Tasks – Size and Position
To view the coordinates, width, and height of objects on the process graphic, select them and click Size and Position . In the window of the same name, the size properties of the individual objects can easily be changed to specific values.
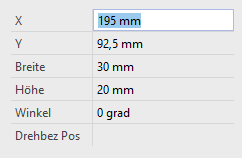
The Size and Position window can be placed and pinned anywhere on the drawing sheet.
Task – Drawing Explorer
The Drawing Explorer window can be shown and hidden with this. The drawing explorer contains all the content of the process graphic with its technical (Visio) properties.
"Zoom" Group
To set a specific zoom factor in the process graphic, click on the Zoom button. The Fit to window and Drawing sheet width buttons are available for quickly adjusting the process graphic.
"Visual Aid" Group
The Dynamic Grid and AutoConnect features can be enabled or disabled here. Select the Connection points option if you want them to appear on the shapes.
In the Align and Glue window, the settings for snapping and gluing of elements in the graphic can be adjusted. To do this, click on the arrow symbol [  ] at the bottom right of the group.
"Main Window" group
Switch and arrange windows
If you click on Switch windows, you can jump to one of the currently open graphics with one click.
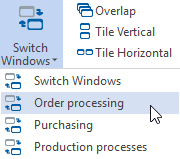
In addition to the standard Overlap, the windows can also be arranged one above the other or side by side. To do this, click on the Tile buttons in the View tab.
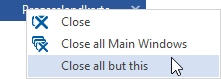
Close window
If you want to close the main windows (eg all open graphics), click on the View tab in the Main Windows group on the Close button.
Alternatively, you can right-click on the main window tab and from the context menu [.png) ] select one of the following options:
] select one of the following options:
- Close (only this window will be closed)
- Close all main windows
- Close all but this (only the current window remains open)
"Layout" group
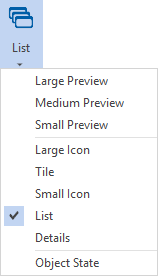
In some windows, different views can be set using the List button. As known from Windows Explorer, you can choose between different icons, list and detail views, for example.
.png) ] of the window.
] of the window."Numbering" group
Only process and branch symbols can be numbered in the process graphic. Information and areas are not numbered.
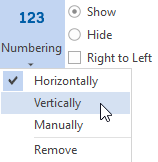
Automatic numbering
Each process and branch symbol on the drawing sheet is automatically numbered from left to right and top to bottom by default.
The following options are available for automatic numbering:
button/option |
function |
a notice |
 |
Default setting. The numbering is done automatically from left to right and (!) from top to bottom. |
|
|
The numbering is first from left to right and only then from top to bottom. |
Example: The elements in the top swimlane are numbered first, then those in the second, third, etc. swimlane. |
 |
The numbering is removed. | |
|
Hide hides the numbering in the currently displayed graphic, but does not remove it. |
Show is the default. |
|
The numbering displayed in the Processes window can be removed by clicking Hide and shown again by clicking Show. |
The Numbering group (tree) only appears if the Processes window is open and active (click in the window or title bar). |


Manual numbering
If you need a specific order of numbers, processes and branches can also be numbered manually:
- Click Numbering – Manually.
 The Number window appears.
 - Enter a starting number for the first number (default is "1").
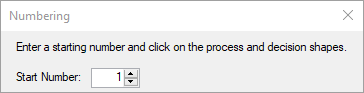
- Click on all processes and branches in the graphic in the order of the desired numbering.
- Finish numbering by clicking on the cross at the top right of the Numbering window.